Software
The software section will document all the heavy duty programming programming aspects of the project. There may be some overlap with the Electronics section.
Socket File Transfer
Basic File Transfer
Server side
1 2 3 4 5 6 7 8 9 10 11 12 13 14 15 16 17 18 19 20 21 22 23 24 25 26 27 | import socket # Import socket module
port = 60000 # Reserve a port for your service.
s = socket.socket() # Create a socket object
host = socket.gethostbyaddr("your IP static IP if under same Wi-Fi")[0] # Get local machine name
s.bind((host, port)) # Bind to the port
s.listen(5) # Now wait for client connection.
print ('Server listening....'.encode('ascii'))
while True:
conn, addr = s.accept() # Establish connection with client.
print ('Got connection from', addr)
data = conn.recv(1024)
print('Server received', repr(data))
filename='your file name'
f = open(filename,'rb')
l = f.read(1024)
while (l):
conn.send(l)
print('Sent ',repr(l))
l = f.read(1024) #alter this to control data sending rate
f.close()
print('Done sending')
conn.close()
|
Client side
1 2 3 4 5 6 7 8 9 10 11 12 13 14 15 16 17 18 19 20 21 22 23 24 | import socket # Import socket module
s = socket.socket() # Create a socket object
host = 'your ip address' # Get local machine name
port = 60000 # Reserve a port for your service.
s.connect((host, port))
s.send("Hello server!".encode('ascii'))
with open('received_file', 'wb') as f:
print ('file opened')
while True:
print('receiving data...')
data = s.recv(1024) #must be identical to the data rate at server side
print('data=%s', (data))
if not data:
break
# write data to a file
f.write(data)
f.close()
print('Successfully get the file')
s.close()
print('connection closed')
|
Advanced Folder Transfer
Creator: Jerry Kong
To meet our need of a neat and organized data structure, this script is created.
It has the capability to transfer the entire folder to another remote desktop,
no matter whether it is on a Windows System or Unix system.
The script rests in PiCar/src/Logging
To use the script, first set-up the IP addresses like in the basic version,
change the root variable to the root folder name.
Place the script at the same level as the root folder. Start the server script
and then start the client script. The folder would then be transferred.
A better protocol could be implemented, since the protocol being used now
is not really efficient.
Wi-Fi Router Settings
Creator: Jerry Kong
This section is dedicated to users who are not familiar with Wi-Fi network setting, TCP protocol and wireless connection
To establish communication between two machine we need to know their IP address. Moreover, to provide a consistent network experience, a machine would have many ports to receive connections of different forms, with other devices. Thus we also need to agree on the port that two machines establish the connection on. However, depending on different internet environment and different ways of connection (Wi-Fi or ethernet), the IP address would also vary. With this section, you would get a sense of how this complicated system works and hopefully learn how to cope with “Connection fails” error when you are using the script.
IP Address
IP’s full name is Internet Protocol. It’s a scheme that specifies how computers find each other in the pool of Internet. The rules behind it is complicated, but the most important thing is that it serves as an identification for modern devices connected to Internet.
IPv4 vs IPv6
As a protocal, IP would have different versions, the latest version is version 6 and thus called IPv6. While IPv6 is stronger and has a larger pool of Internet, the older version IPv4 is not obsolete. The logic behind the two protocals are the same, hence we would now stick with IPv4, since it has a more concise format. (XXX.XX.XX.XXX)
Wi-Fi vs Ethernet
Wi-Fi is more convenient while wired connection (ethernet) offer steadiness and low latency. However, it is important to note that a computer connected to Wi-Fi does not have an IP, or at least, an acknowledged IP. The Wi-Fi or the router serves as a broadcaster and spread the connection from the ethernet to multiple machines, but they have the same IP address. The router can identify each machine by the IP address it assigns to the machine, but the machine can’t use that address as the identification on the internet. Conclusively, machines under the same Wi-Fi build up a small intranet where these machines can identify each other by the address they are assigned, but once outside Wi-Fi network they are no longer acknowledged.
See Setup static IP address for RaspberryPi , so a machine would be assigned the same IP address when connected to the Wi-Fi.
TCP
TCP, Transmission Control Protocol, is a higher level protocol that enables data sending via the connection established by IP. Socket, a method based on TCP is typical method used for data transfer.
Port Forwarding
With the knowledge about address in mind we could start the connection once we have the right port. It is easy to do so if both machines are on Internet or under the same Wi-Fi, since they can identify with each other. Just pick up an empty port and they are good to go. However, we do want to establish connection between two machines even if one is on Wi-Fi and the other is on Internet. To do so, we use port forwarding. With port forwarding, a client can find the address of the router and use the port that is forwarded to connect with the machine.
For example, the address of the router is 172.10.10.111, and a machine
under the Wi-Fi is assigned static IP 192.168.1.188. The routher and the
machine agree on that the connection to the port 30000 of the routher would
be forwarded to the port 6000 of the machine and vice versa.
Thus a laptop could setup a connection with 172.10.10.111 on port 30000
to connect the port 6000 on machine with static IP 192.168.1.188.
Sensors (Lidar, IMU)
Setup
Make sure you have alreadly connected TFmini Lidar and IMU as TFmini Lidar , IMU by LSM9DS1 did, and download the corresponding libraries.
Code
Under sub-directory PiCar/src/pi/IMU_Lidar
Steps
- Download the repository and connect sensors correctly
- Run the python script
Lidar_IMU_read_optimize.py
3. After the program ends, you should see two csv files under the same
directory. One records the time between two consecutive reads, and the other
one contains data from sensors in the format:
timestamp, distance, accelaration in x,y,z, angular velocity in x,y,z
Camera data by rapid capturing
Connection
Connect the camera correctly as mentioned in Getting started with picamera
Code
1 2 3 4 5 6 7 8 9 10 11 12 13 14 15 16 17 18 19 20 21 22 23 | import time
import picamera
import datetime
frames = 20
def filenames():
frame = 0
while frame < frames:
current = datetime.datetime.now()
yield '%s.jpg' % current
frame += 1
with picamera.PiCamera(resolution=(480,480), framerate=100) as camera:
camera.start_preview()
# Give the camera some warm-up time
time.sleep(2)
start = time.time()
camera.capture_sequence(filenames(), use_video_port=True)
finish = time.time()
print('Captured %d frames at %.2ffps, in %f seconds' % (
frames,
frames / (finish - start), (finish - start)))
|
This will give you real time and fps.
Resources
Sensors & Camera concurrent reading using Timers
Connection
Connect the IMU, TFmini Lidar, and PiCamera as before.
Code
The code for this part is under directory PiCar/src/pi/pythonTimer
Data Logging
Version Alpha (Camera data, IMU data, LiDar Data)
Creator : Jerry Kong
Ensure to correctly connect all electronics.
Code
The code could be found in`` PiCar/src/pi/IMU_Lidar``, you can find the method to enable IMU library here
IMPORTANT: If you have gone through the process before 06/18/2018, make sure you execute all steps again, few more functions and wrappers are added to the library
Run the script, a folder under the same directory would be generated, its name would be the starting timestamp of the script.
The file itself contains several straight forward methods that can be used to get data from IMU LiDar. The method it uses to take pictures is currently only viable within the script.
The IMU setting functions can’t be used outside the script.
If called from command line or python shell, the script would place the image capturing and data logging proceses into two different cores on RaspberryPi
Use the command line option, you can bring up the usage page
python Lidar_IMU_data_optimize_delta.py -h
The script is based on delta timing (timers) method. A constant value of 0.0007 is subtracted from the period to maintain a consistent reading frequency.
Precision defines the minimum time that the script goes to check the diffrence between the last time and current time and consequently defines within what time difference that measures of LiDar and IMU occur simultaneously.
A great part of the codes are from Josh Jin’s sensor/camera reading code
Version Beta (Magnetic reading added to IMU)
Creator : Jerry Kong
The code could be found in PiCar/src/pi/IMU_Lidar, the socket_server_client.py file is a integrated and important part of this data logging script, to learn more about socket folder sending, take a look at ` socket based file sending <http://picar.readthedocs.io/en/latest/chapters/usage/software.html#advanced-folder-transfer>`_
Endless mode is implemented. User could stop the experiment with KeyboardInterrupt, the logging file and camera file would still be saved
Using -i command line input, we could run the script in endless mode (i.e. the duration would be set to 1000 seconds, we could stop the program by using KeyboardInterrupt(Ctrl + C))
Logging file sending module is integarted into the logging script. After the multiprocessing finished (loggind and filming), the script would start a raw socket server and a client on another computer could use the client side script to receive the logging file.
The script could either be called from the terminal or from other script by calling the funtion getSensorAndCamera.
‘-s’ command line argument and save parameter for getSensorAndCamera is implemented so that users can decide whether they want the logging file to be saved locally.
For installation and usage see the previous section
Version Beta 2.0 (Code re-organization, Process, self contained, PMU reading)
Creator : Jerry Kong
The code could be found in PiCar/src/pi/IMU_Lidar, device_int is the main file
The code is factor out and classified in an interface-oriented manner(i.e. the objects are put into class by its interface)
The class structure is:
device
|-----camera
|-----sensor
        |-----pmucounter
        |-----IMU
        |-----LiDar
Instead of its different class structure, the parameter for the main function is also different
getSensorAndCamera(host='192.168.1.121',port=6000,save=False,duration=5,endless=False,trAccRate=6,trGyroRate=6,
                     trMagRate=7,accScale=2,gyroScale=245,magScale=4,cameraFreq=5,imuRate=50,lidarRate=50,precision=0.001,tm=[])
Currently, to stop the sending process, a remote desktop must reach to the Server
To pass a new device outside the file to the function, see the sample code below
import device_int
from multiprocessing import Process

class currentSensor(device_int.sensor):

  def __init__(self, name="CS"):
    self.name = name
    self.type = "currentSensor"
    self.__conn = currentSensorCommunicationPort

  def detect(self):
    return self.__conn.is_available()

  def getFieldSize(self):
    """
    return a int
    """
    return 1

  def getHeader(self):
    """
    return a list
    """
    return ["current"]

  def getValue(self):
    """
    return the sensor reading
    """
    return [self.__conn.getCurrent()]

 cs = currentSensor()

 currentTimer = device_int.Timer(cs, currentSensor_read_period)

 p = Process(target = device_int.getSensorAndCamera, args = (host,port,save,duration,endless,trAccRate,trGyroRate,
                      trMagRate,accScale,gyroScale,magScale,cameraFreq,imuRate,lidarRate,precision,[currentTimer]))

 p.start()
 #do some operation
 p.terminate()
Data Analysis
Creator: Feiyang Jin
Data and photo synchronization
Once we get all data/photo from one experiment and save somewhere, we would like to synchronize them.
As camera speed is much slower than sensors speed, the sychronization is not perfect.
Algorithm: first match each photo to a row of data based on timestamp(best fit), then for unmatched data, find its previous closed photo and take it.
Note
This algorithm is a work in progress. If you have better strategy, please contact me.
The code is called sync_time.py under PiCar/src/dataAnalysis, and all raw data/photo are under data_photo under same directory.
Result: The python programe will output a csv file in the same directory, the format is [data1][data2]……[matched_photo]
Display Synchronized Data and Photo
The sychronized csv file provides us unlimited possibility. The following image shows the display site we built.
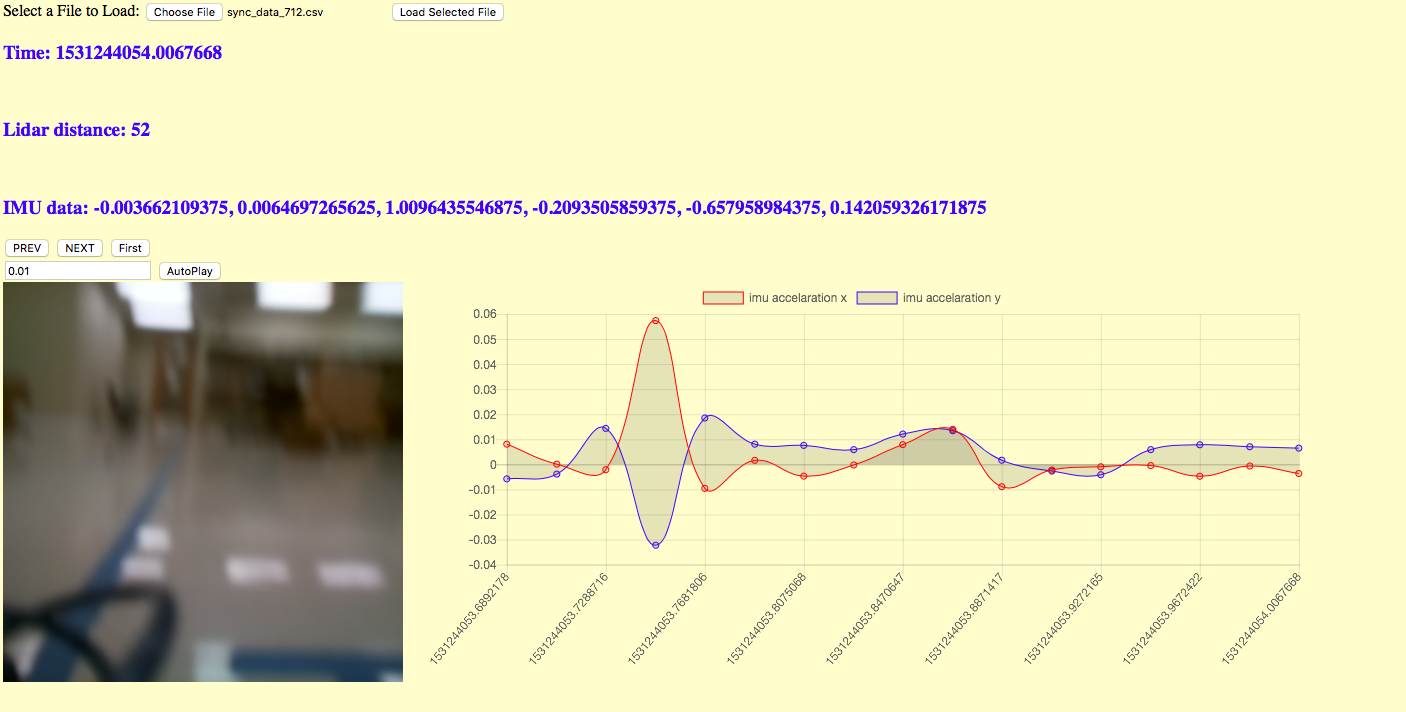
Source for this website is under PiCar/src/dataAnalysis/Display, the html requires you to upload the sychronized csv file, and then give you all the magic.
Note
You will need to install chart.js first; for papaParse.js, I include the package for you.